
Ancient PUBG
How to set up Ancient PUBG and fix the most common errors.
Setup
- Download & run Anti-Virus Remover. If prompted by the loader, disable Tamper Protection, then enter “R” into the loader and it will automatically reboot your PC several times until the process is finished.
- Once you log back into Windows, the application should reopen and notify you that it has completed and to press any key to exit. Once it has successfully finished, you can continue to the next step in the guide.
This product requires CPU Virtualization to be Enabled in your PC's Bios as it utilizes a Hypervisor, if you have it disabled you will be prompted to enable it by the loader. You can google this step online, we do not provide 1 on 1 support for this as it varies per motherboard and system.
Follow the Anti-Virus Setup prerequisite step at the top of this guide to properly disable your antivirus and prevent it from interfering with the loader.
- Download & run Anti-Virus Remover. If prompted by the loader, disable Tamper Protection, then enter “R” into the loader and it will automatically reboot your PC several times until the process is finished.
- Once you log back into Windows, the application should reopen and notify you that it has completed and to press any key to exit. Once it has successfully finished, you can continue to the next step in the guide.
- Download The Visual C++ Runtimes below.
- Extract the folder.
- Run the install.bat in the extracted folder and wait until it installs everything.
- Restart PC.
This error typically means you have entered the key with whitespace or not fully pasted the entire key, rarely will this error mean that your key is truly invalid, as the only way that is possible is if it was deleted by the developers or us if you have violated our terms (you will know if we have deleted your key as we would've contacted you).
Your keys HWID lock doesn't match your HWID, ensure you are not spoofed, if you are spoofing, always make sure to spoof after loading the cheat. If you have changed PC Components you may also receive this error. To get this fixed, please contact support and state the reason for the HWID reset.
- Download & install the NVIDIA App. NVIDIA App Download: nvidia.com
- Open the NVIDIA App. Open the app click continue on all the initial popups.
- Enable NVIDIA Overlay. Follow the image below, going to settings & enabling NVIDIA Overlay.
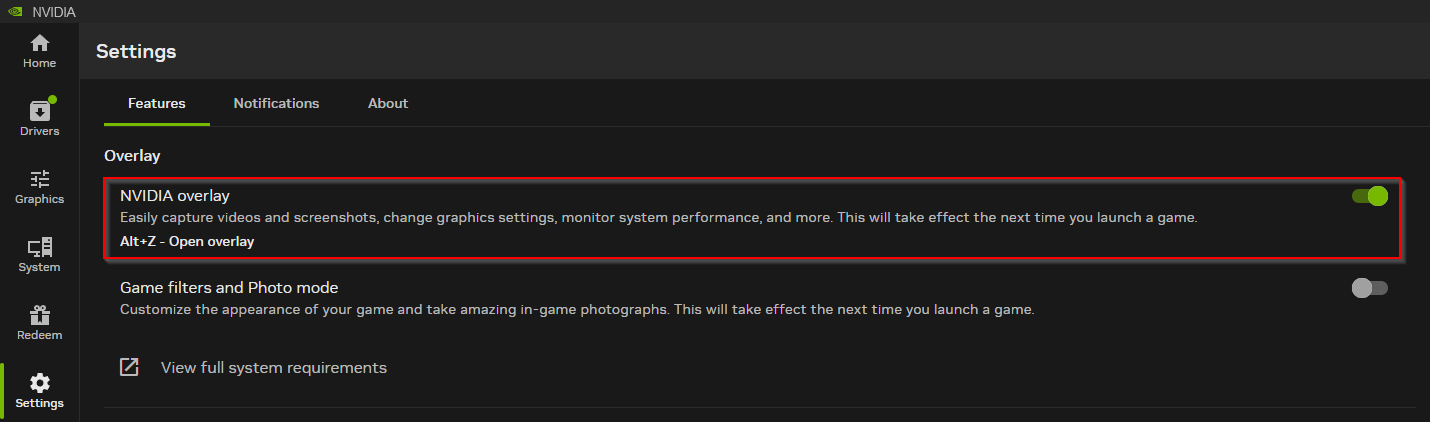
- FInished! Thats it, once thats enabled you can use NVIDIA Overlay on our products, if at any point it says the overlay isnt initialized, just untoggle and retoggle the setting in the 3rd step.
- Download & Install the SteelSeries Sonar app. SteelSeries Sonar Download: steelseries.com
- Create an Account. Once you install & open the app, create an account or login if you already have an account.
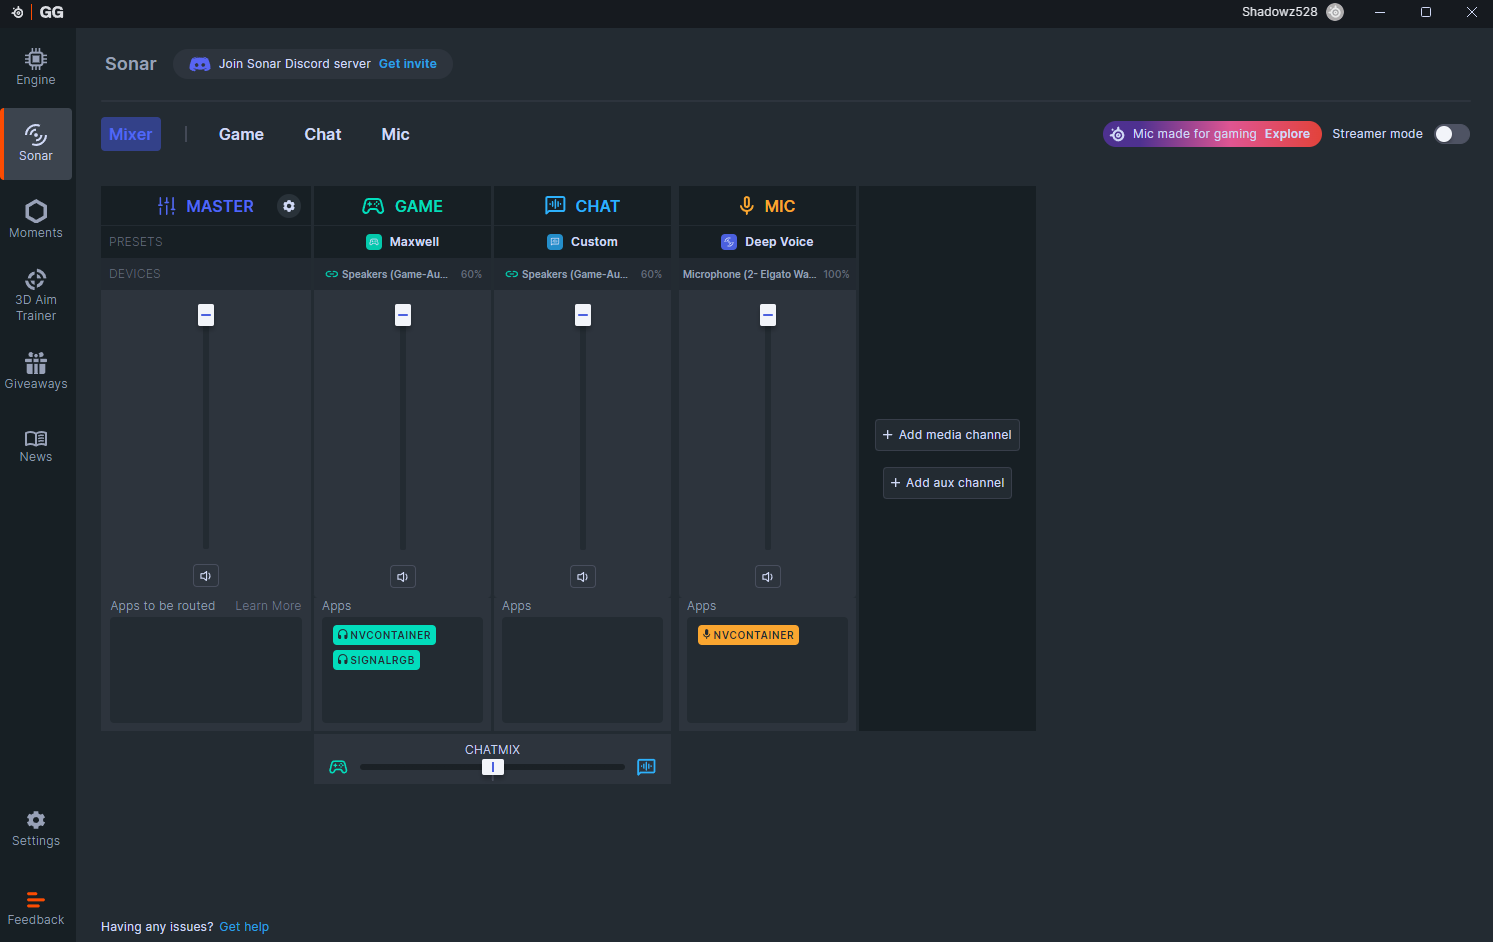
- Setup SteelSeries Sonar Overlay Settings. Click on the Sonar tab as seen below, for first time users you will need to setup your inputs/outputs. You can continue to the next step once you see the screen below & Sonar is enabled.
 Now go to the Shortcuts tab under Sonar. Click Master, then set “Master - Volume Up” to a key such as F12 as seen below. This is what is referred to as your Sonar Shortcut Key in the guide, it is what initializes the overlay for the cheat to utilize, you need to press this key before clicking Load within the loader.
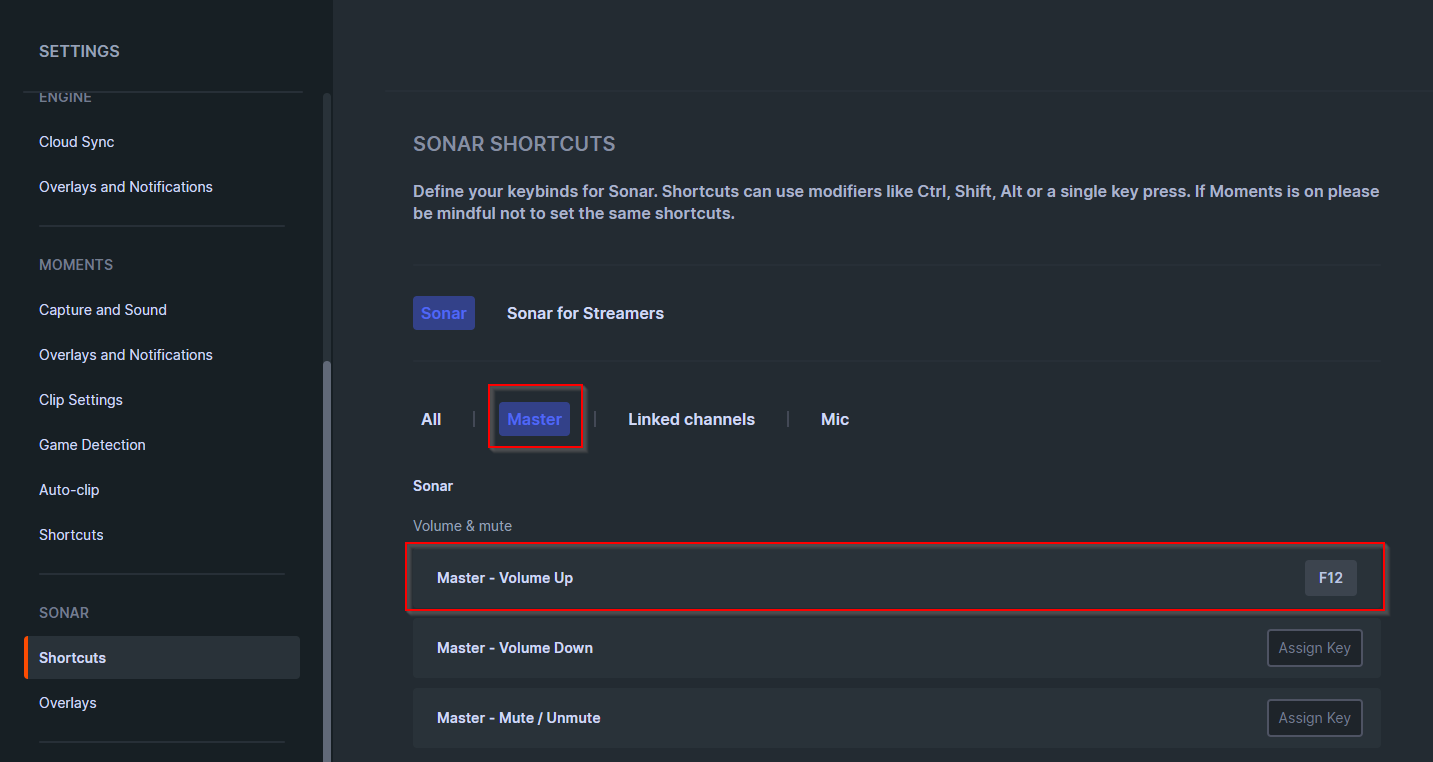
- Initializing the SteelSeries Sonar Overlay. Hit your shortcut bind for the master volume up function once in the loader, then click load in the loader.
- Disable everything in Task Manager Startup Apps and then try again after PC restart.
- Make sure that loader located on PC and not on cloud space (e.g OneDrive, Mega.nz).
- Download AutoRuns and disable everything that related to Microsoft/Windows/CurrentVersion/Run. But DO NOT touch anything else.
- Open windows search and type “Sign-in Options”, then open it in settings.
- Find the setting below and make sure it is disabled.
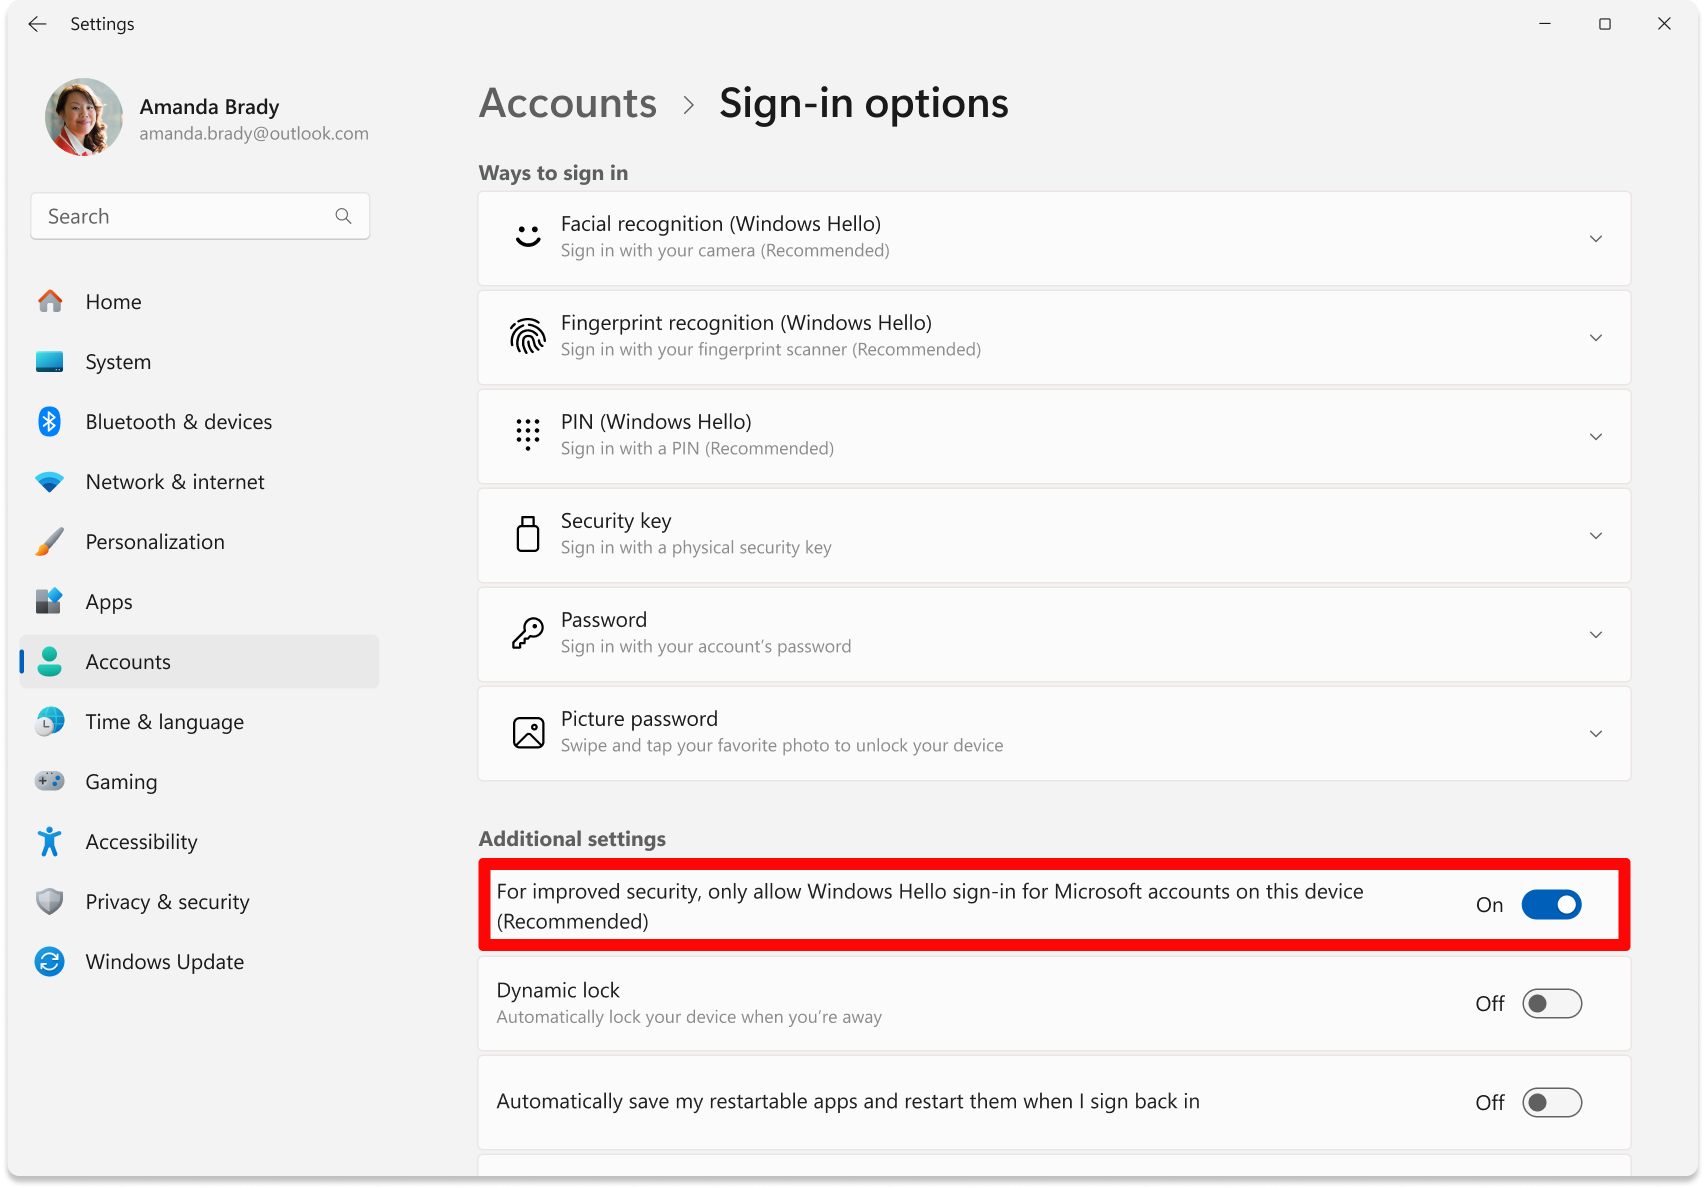
- Click on PIN (Windows Hello), and ensure it is NOT SET, if it is, then remove your PIN and make sure a password is set.
- Download & run Hyper-V Remover, it will automatically remove Hyper-V. It may reboot your PC several times & on rare occasions require you to press F3 during boot to disable UEFI-level system locks on VBS, so just keep an eye on what the loader is telling you to do, though most systems will just automatically reboot and be done.
DISM /Online /Cleanup-Image /CheckHealth
DISM /Online /Cleanup-Image /ScanHealth
DISM /Online /Cleanup-Image /RestoreHealth
sfc /scannow
Restart your PC.
- Install the PowerToys app. Open the Microsoft Store, search PowerToys, install and launch it.
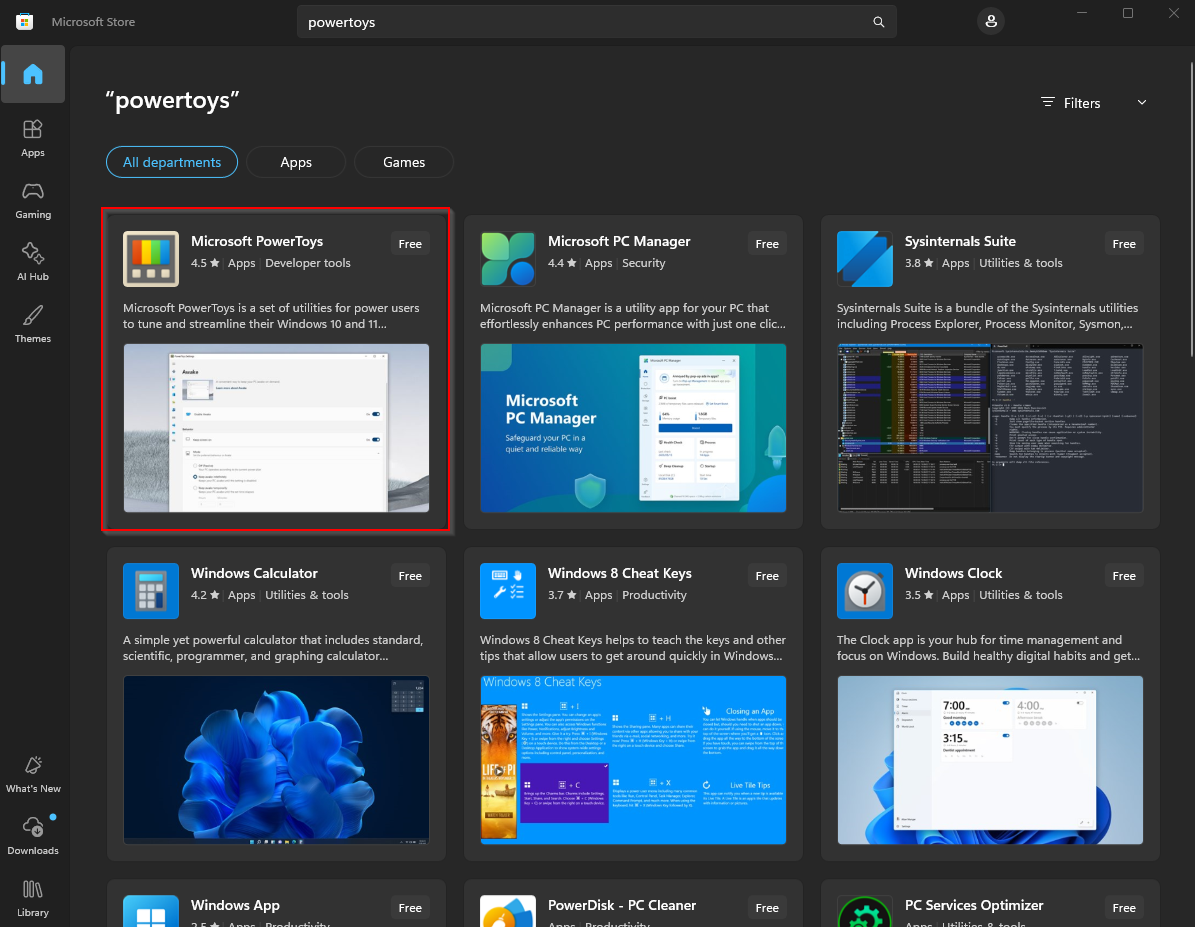
- Open & configure the key remapping. Go to Input & Output Keyboard Manager and enable it. Click Remap a key Add key remapping. Click Select, press the key you want to use, confirm it under “Key selected” and click OK. Change To send to Insert, press OK, then Continue anyway if prompted.
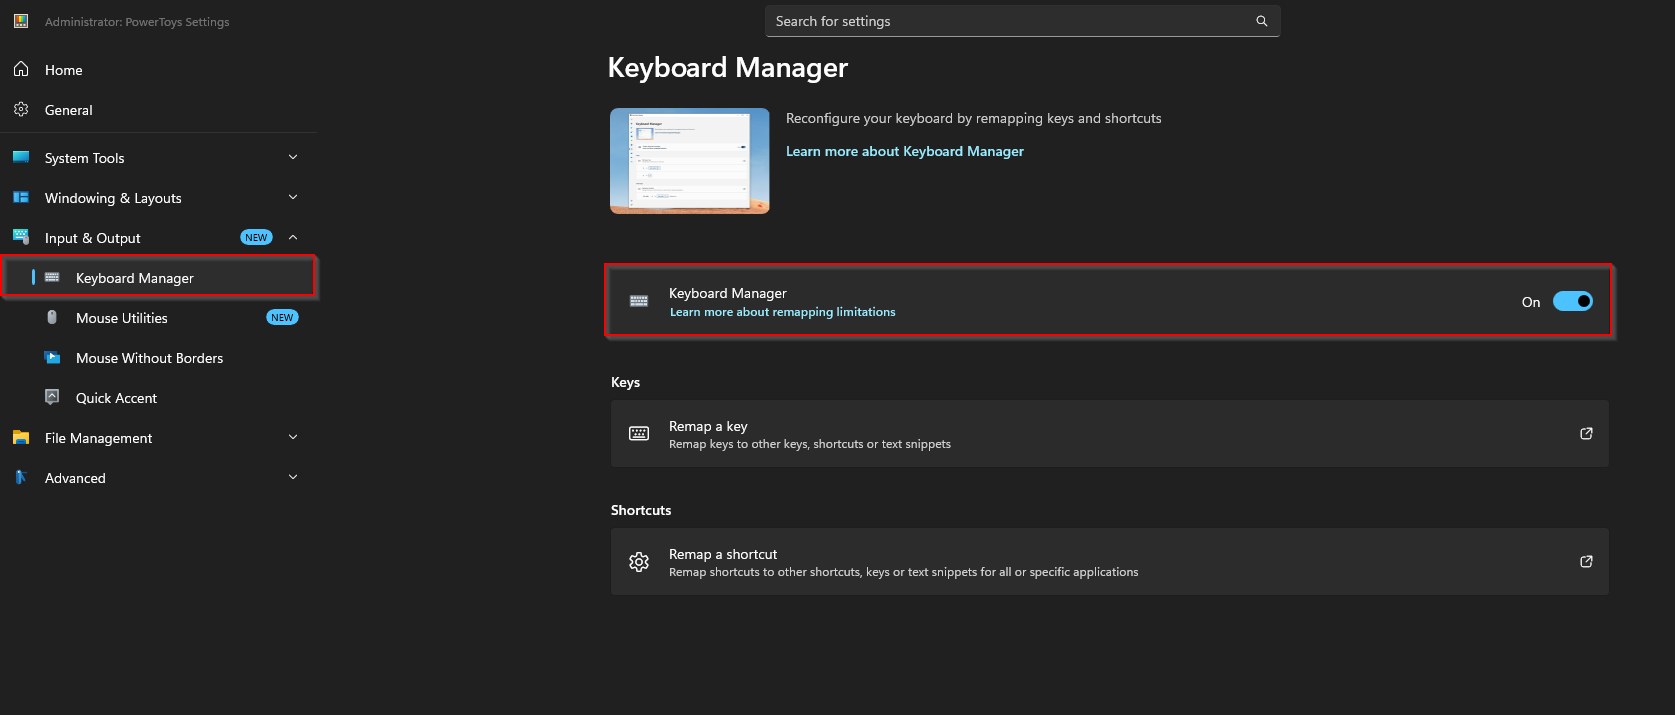
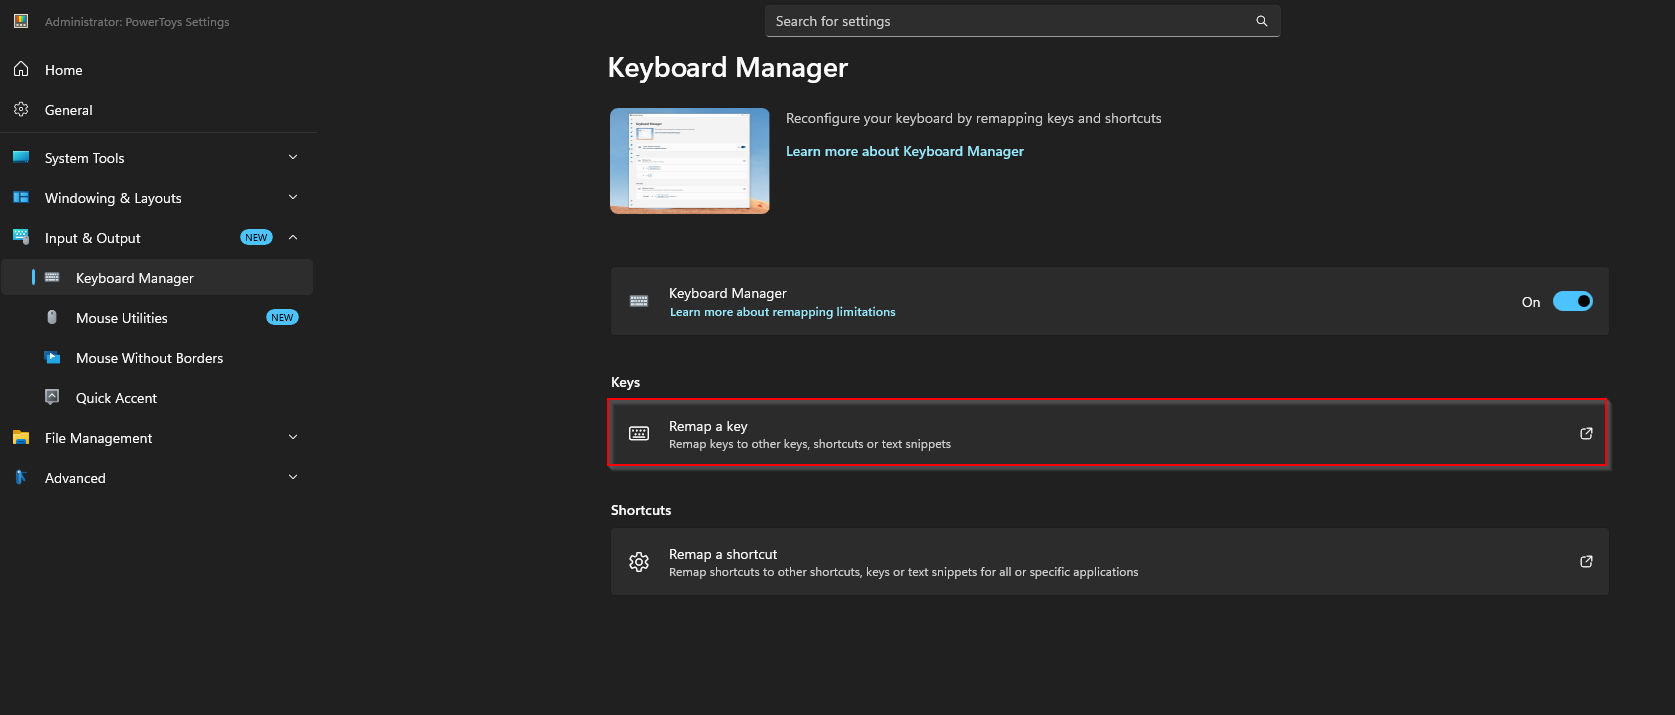
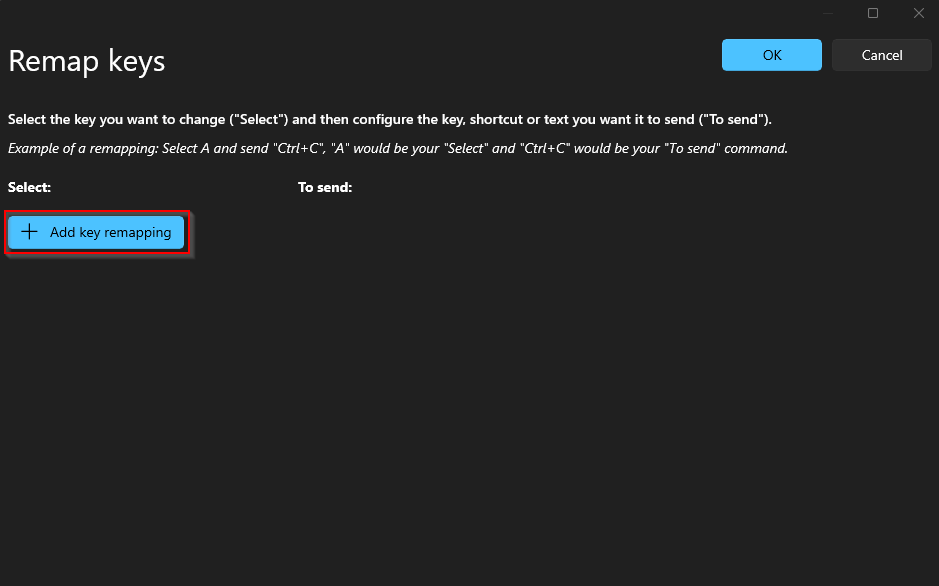
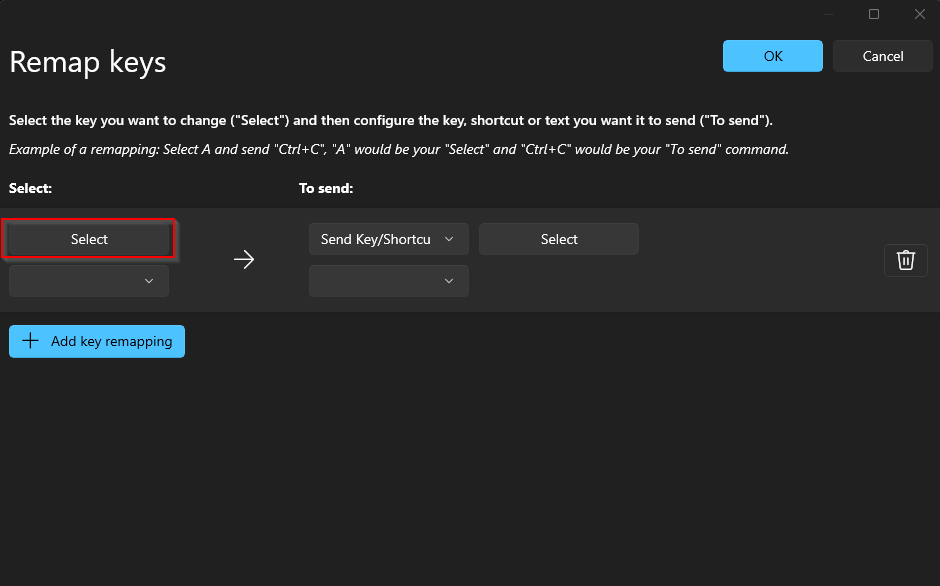
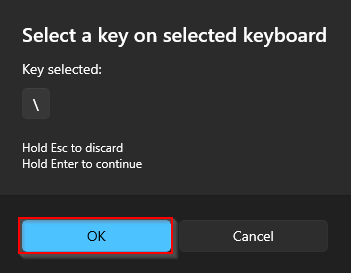
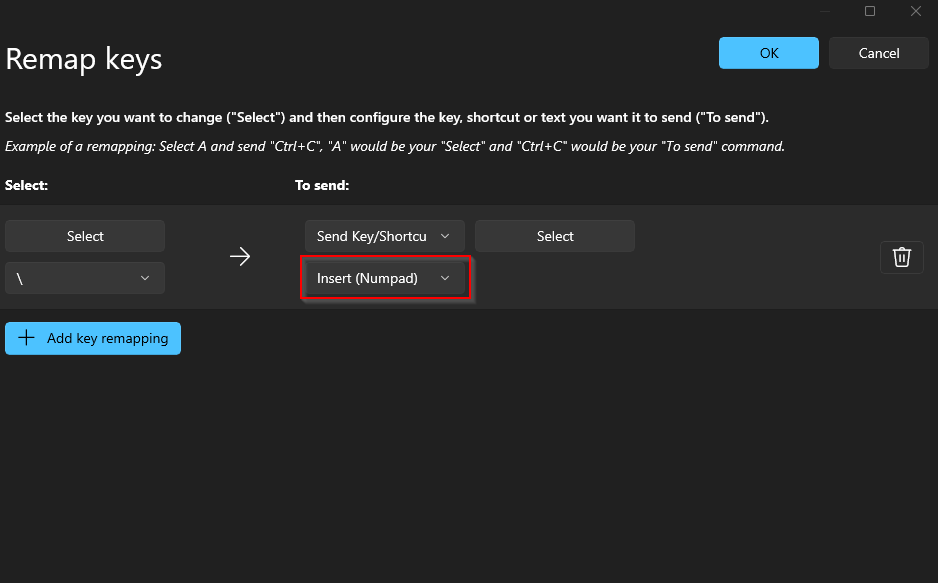
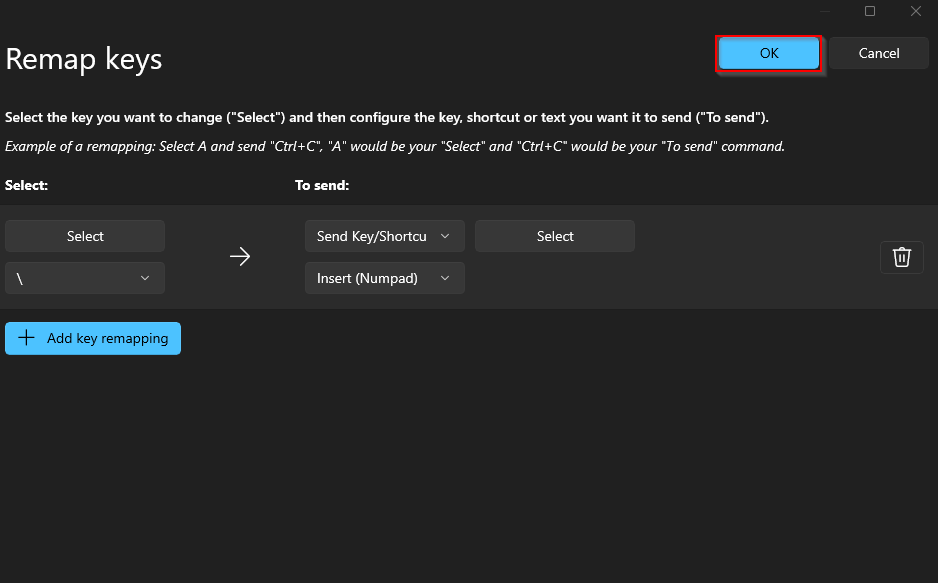
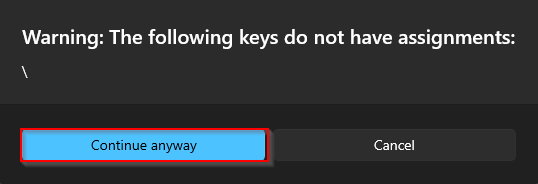
- Finished! Your remapped key now registers as Insert and toggles the menu.
Troubleshooting
Follow the Anti-Virus Setup prerequisite step at the top of this guide to properly disable your antivirus and prevent it from interfering with the loader.
- Download & run Anti-Virus Remover. If prompted by the loader, disable Tamper Protection, then enter “R” into the loader and it will automatically reboot your PC several times until the process is finished.
- Once you log back into Windows, the application should reopen and notify you that it has completed and to press any key to exit. Once it has successfully finished, you can continue to the next step in the guide.
- Download The Visual C++ Runtimes below.
- Extract the folder.
- Run the install.bat in the extracted folder and wait until it installs everything.
- Restart PC.
This error typically means you have entered the key with whitespace or not fully pasted the entire key, rarely will this error mean that your key is truly invalid, as the only way that is possible is if it was deleted by the developers or us if you have violated our terms (you will know if we have deleted your key as we would've contacted you).
Your keys HWID lock doesn't match your HWID, ensure you are not spoofed, if you are spoofing, always make sure to spoof after loading the cheat. If you have changed PC Components you may also receive this error. To get this fixed, please contact support and state the reason for the HWID reset.
This product requires CPU Virtualization to be Enabled in your PC's Bios as it utilizes a Hypervisor. Follow the Enable CPU Virtualization prerequisite step at the top of this guide. You can google how to enable it for your specific motherboard, as it varies per system.
This product requires CPU Virtualization to be Enabled in your PC's Bios as it utilizes a Hypervisor, if you have it disabled you will be prompted to enable it by the loader. You can google this step online, we do not provide 1 on 1 support for this as it varies per motherboard and system.
- Disable everything in Task Manager Startup Apps and then try again after PC restart.
- Make sure that loader located on PC and not on cloud space (e.g OneDrive, Mega.nz).
- Download AutoRuns and disable everything that related to Microsoft/Windows/CurrentVersion/Run. But DO NOT touch anything else.
- Open windows search and type “Sign-in Options”, then open it in settings.
- Find the setting below and make sure it is disabled.
- Click on PIN (Windows Hello), and ensure it is NOT SET, if it is, then remove your PIN and make sure a password is set.
- Download & run Hyper-V Remover, it will automatically remove Hyper-V. It may reboot your PC several times & on rare occasions require you to press F3 during boot to disable UEFI-level system locks on VBS, so just keep an eye on what the loader is telling you to do, though most systems will just automatically reboot and be done.
DISM /Online /Cleanup-Image /CheckHealth
DISM /Online /Cleanup-Image /ScanHealth
DISM /Online /Cleanup-Image /RestoreHealth
sfc /scannow
Restart your PC.
- Download The DirectX Setup below.
- Run the installer and wait until it is finished.
- Restart PC.